Replace El's Kitchen: International Comfort Food: Easy
Showing posts with label Easy. Show all posts

Tuesday, November 8, 2016

Tuscan White Bean and Pancetta Sauté

What is Tuscan? I've always wanted to know what that meant when Chefs said it. And after a bit of research and lots of cooking, I realized that Tuscan just means delicious and simple. The Tuscans are called the bean eaters so this dish is wholly appropriate. They utilize herbs and just a few simple ingredients to make their dishes. And isn't that the best food? Something that is simple, rustic and hearty? Something that reminds you of home without all the anxiety and effort?  I think that's why I like this Tuscan White Bean and Pancetta sauté. It's effortless, enjoyable and extremely tasty. It's savory and filling. Which of course, is a necessity in comfort food. Because sometimes it's not just the feeling you get from the food but the enjoyment of making it.


During this time of year, the days are short and it's dark so early. It's nice to have a meal you can whip up quickly, so you can just enjoy the evening (or what's left of it) with the family. What better way to enjoy each other than talking over dinner. I've added some kale to this dish for added nutrition but you could add spinach or pasta if you so choose. Either way the family gets to spend most of its time at the dinner table and not in the kitchen.

Of course, there are so many other reasons this dish is wonderful and one is its versatility. Add a couple of cups of soup stock and it's a warming soup serving as your starter. Or add some tortellini and it can serve as your main course. Perhaps you've decided to veg on the couch. That ok too. Remove the kale, whip the beans up in a food processor and have it as dip with some tortilla chips. I know, yum, that might happen tomorrow. Anyway, I love a dish and it's fluidity is even more appealing. It can be reinvented for whatever occasion you need. So how do you plan on whipping this up tonight?

Tuscan White Bean and Pancetta Saute
Makes 4 -6 servings

Ingredients
2 cans of cannellini beans (rinsed and drained)
1 tablespoon olive oil
3 cloves of garlic sliced
1/2 onion diced
4 ounces kale
4 ounces pancetta
1/2 teaspoon dried sage
1/4 teaspoon of chicken stock
1/2 teaspoon salt

Directions:
In a dutch oven or large pan heat olive oil over medium high heat.

Once pan is hot, add pancetta. Cook until crispy and lightly browned.

Remove pancetta from pan.

Add onion to pancetta grease and cook until translucent.

Add kale and salt. Mix until thoroughly combined.

Add garlic, beans and sage.


Mix all ingredients thoroughly, add pancetta.

Add 1/4 cup of chicken stock and allow stock to evaporate.

Salt and pepper to taste.


Serve with bread or pasta.


Tuesday, October 4, 2016

Cold Sesame Noodles

I love noodles!! It's a carb thing. I remember my first time having cold sesame noodles, I was taken aback. There was a large group of us and one of my friends was familiar with the restaurant so she ordered for all of us. I had no idea the dish ordered would be cold. Once I got over the shock, I realized I was in love. Not only is this dish tasty, it works particularly well when you need a quick meal (like a school lunch). The noodles only take 5 minutes to cook and it does not need to be re-heated. I actually always have a bag of flat buckwheat noodles laying around. It's perfect for that morning you decided to ignore the alarm and time got away from you.


But back to the noodles. I remember reading an article in the New York Eater about these noodles originating almost 40 years ago in New York at a restaurant called Hwa Yuan. The article stated that it was the favorite dish of all the stars. Well, we are all stars today. Hooray!!

Note: Adapted from the recipe in the New York Times. The recipe below suggests chinese sesame paste but I use tahini paste because that's what I have on hand in my house.

Cold Sesame Noodles
Makes 6 Servings

Ingredients:
1 pound Chinese buckwheat noodles (spaghetti noodles)
2  1/2 tablespoons sesame oil
3 1/2 tablespoons soy sauce
2 tablespoons Chinese rice vinegar
2 tablespoons Chinese sesame paste (or tahini paste)
1 tablespoon smooth peanut butter
1 tablespoon sugar
1 tablespoon grated ginger
2 teaspoons minced garlic
2 teaspoons chili -garlic paste - optional

Garnish: Carrots, cucumbers or radishes cut into match sticks
sesame seeds
finely chopped green onion

Note: 2 packets of soy sauce equals a little more than 1 tablespoon. Yeah, I've done it. So what.

Directions: 

Bring a large pot of water to a boil. Add noodles and allow noodles to cook about 5 minutes or until tender.

Drain pot and rinse noodles with cold water.


Sprinkle noodles with 1/2 tablespoon of sesame oil. Place noodles in the fridge.

In a bowl whisk together sesame oil, soy sauce, rice vinegar, sesame paste, sugar, ginger, garlic and chili -garlic paste (if using)

Pour sauce over noodles and toss.

Add garnishes.

This is really a versatile dish that can become a full meal if you add a protein like tofu or chicken.


So, how will you eat your sesame noodles?


Tuesday, September 27, 2016

Peruvian Quinoa Soup

These days some magazine is always talking about super food this and superfood that. But let's be honest, we want food that tastes good and makes us feel good. I was first introduced to quinoa by an Argentinian colleague of mine. We were having a conversation about her family being Jewish and Argentinian and how there are all these misconceptions about her. My point is she mentioned her family did not eat rice, but quinoa. At the time, I was only really familiar with food from places like Puerto Rico and the Dominican Republic because of where I grew up. I thought everyone ate rice. Boy was I wrong. Of course, she was a sweet heart and didn't embarrass me just educated me. And she did it the best way possible, with food. One of the dishes I had was sopa de quinoa - quinoa soup. It was warm and delicious and perfect for a chilly Fall day.


Sopa de quinoa can be made as a vegetarian dish or with meat. When I first had this dish in the Fall many years ago it was served with beef. And though the person who introduced it to me was from Argentina, I later learned that quinoa was the staple of several other Latin American nations like Peru. Each nation makes its version of soap de quinoa based on the food stuff of that country. This will be a vegetarian version (for all my non meat eating friends), since I'm constantly trying to prove I can make great comfort food without meat. Since this is a vegetarian version feel free to amp it up with all of the Fall vegetables you like. Me... I'm adding corn, potatoes, maybe even some squash. It's really a great healthy dish. Defying the misconception that all comfort food is bad for you. It's got tons of vegetables and the quinoa provides a healthy protein.

Peruvian Quinoa Soup
makes 6 to 8 servings

Ingredients
1 cup quinoa
2 cups of water
3 cups of vegetable stock
2 cloves of garlic minced
1/2 onion sliced
2 medium carrots (chopped)
2 stalks of celery (chopped)
1 cup of potatoes (boiled & cubed)
1 cup corn
1 cup of winter squash (cubed)
fresh parsley or cilantro
1 teaspoon cumin
1 teaspoon salt
2 tablespoon sazon
1 teaspoon oregano
1 teaspoon paprika
2 bay leaves
1 tablespoon olive oil

Directions:
Start by rinsing the quinoa. Place quinoa is a coffee filter and then place in a strainer.

Gently allow water to flow over quinoa and out the bottom of the strainer.

Place aside and allow quinoa to dry.
In a medium pot heat olive oil over medium heat.

Add garlic and onions to pot and cook until soft (about 2 minutes).

Add corn, squash pre cooked potatoes and any additional vegetables and cook for 10 minutes.

Once vegetables begin to become slightly soft, add cumin, paprika, oregano, sazon, parsley and salt.


Add quinoa and mix so all elements are covered with spices about 10 minutes.

 Add water and vegetable stock. Stir well and bring to a boil.

Once boiling turn heat to medium low and cook for 20 minutes.

Salt and pepper to taste.

Top with onions and avocados or with sour cream and diced chili peppers. Any way you top it, it's delicious.

If you like this dish, please scroll to the bottom and subscribe.


Tuesday, September 20, 2016

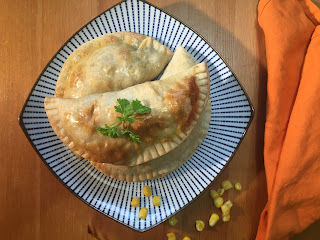
Corn and Poblano Empanada

September 15 is the beginning of Hispanic Heritage month. In celebration of hispanic heritage month I wanted to share some of my favorite dishes. The first is a corn and poblano pepper empanada. Typically I eat empandas filled with meat but while prepping for a dinner with some of my friends I realized I needed something without meat. Little did I know I, this carnivore would fall in love with a vegetarian empanada. The mixture of cream cheese, peppers, corn and potatoes creates the perfect gooey bite with a bite of crunch. It's extremely easy to make and requires very little cooking (especially if you use a frozen bag of corn). It's actually the prefect dish if you are in a rush  but want something filling and flavorful.


So congrats to those Latin American nations that gained independence throughout the month of September. It literally changed the course of the Americas. Of course, since I teach history, I think it's important to honor the contributions of all Americans. Of course, because of my upbringing I have an affinity for mi gente from this region. It's in their kitchens that I learned how to cook hispanic food from as young as 6 years old. My friends and their families welcomed me into their homes and their lives. Making a place for me in the kitchen and at the table allowing me to experience and enjoy hispanic food and culture years before I ever traveled anywhere. It is those bonds an ties that ignited my love of hispanic culture and cuisine. And to them I must say, thank you.

Corn & Poblano Empanada
Makes 12 Empanadas

Ingredients
1 tablespoon vegetable oil
2 poblano peppers (roasted and diced)
1 1/2 cups of corn
1/2 pound of petite potatoes (3) (diced)
1 green onion chopped
1/2 cup cilantro chopped
2 cloves garlic minced
2 ounces Mexican queso/Monterey jack cheese (shredded)
4 ounces cream cheese
1/4 teaspoon cumin
1/4 teaspoon salt
12 large empanada wrappers
1 egg, slightly beaten

Tools: baking sheet, spatula, parchment paper


Directions:

Preheat oven to 375 degrees Fahrenheit.

Roast poblano pepper over an open flame until slightly blistered. Once cooled dice.


Boil potatoes with sea salt over medium high heat for 20 minutes. Potatoes should be firm. Once cooled, dice.

Heat oil in a skillet over medium heat. Add diced garlic and stir until soft.

Add corn to garlic along with salt and cumin. Cook for 5 to 8 minutes. Corn should turn slightly brown. Remove corn and garlic from heat.

In a bowl, add cream cheese, monterey jack cheese, potatoes, poblano pepper, corn with garlic, green onion and cilantro. Season with salt and pepper.


Scoop two (2) spoonfuls of corn mixture into wrapper (use the back of the spoon to push mixture to the center.


Gently fold wrapper over lining the edges. Once edges a lined up gently press dough together with a fork.

Place parchment paper on baking sheet and spray with non-stick spray.

Gently brush empanadas with beaten egg.

Place baking sheet on the top shelf of the oven and bake until golden brown (about 20 minutes).


Note: This dish is great with some spice. When I'm not concerned with making it too spicy for my mini me I add some jalapeño peppers to the mix. I typically make a little spicy dipping sauce with garlic, hot peppers, onion and lime juice. Don't forget the salt and pepper.

How do you like your empanada? Mild or Spicy?


Tuesday, September 13, 2016

Thai Basil and Beef Stir Fry

Ever have an idea that grows into a huge project? Our garden started as just a little box of herbs on our balcony. Eventually, it grew into the staple of our summer times dishes. This year we've had to be especially diligent about picking basil and mint from our garden. The basil in particular has a mind of its own and has spread to other plants. So, we're also trying to find different recipes we can use it in. This week we had a stroke of luck and we received some free steaks. Woo hoo!! I love free. Of course, that cemented what I would make. Thai Basil and Beef Stir Fry.  I had a little dried Thai Basil left over from another dish I had made, so I mixed it with fresh basil from the garden.


I love Thai food and this dish, has all my favorite elements, layers of flavor, a bit of spice, tasty vegetables and it can be served with rice. It's filling and warming. And not just because of the heat from the Thai chili peppers. I'm pretty conservative with the amount of pepper I add but if you like spice add another chili pepper and make sure to add the seeds.

Now that I think of it, this is actually a great dish for several other reasons. It utilizes the excess basil in the garden, it includes vegetables but more importantly, it's quick and easy. It only takes about 20 minutes to make. That's so important on a week night. Of course, some of these items you may not have in your cabinet if you don't make Asian inspired dishes. But if you know you want to make several different Asian dishes it will be important to keep items like soy sauce, fish sauce and ginger on hand. I keep those items stocked in my pantry to add variety to our lunches and dinners. Having those things on hand makes life easier. In the end, you can't hate great food, done fast. Now that's comforting on so many levels.


Thai Basil Beef Stir Fry
Makes 6 servings

Ingredients
1 pound of beef
2 teaspoons of cornstarch
2 tablespoon sesame oil
1 teaspoon oyster sauce
1/2 tablespoon of fish sauce
2 red bell peppers sliced
1 onion thinly sliced
1 can of baby corn
2 carrots sliced
4 ounces of mushrooms sliced
4 cloves of garlic (chopped)
2 teaspoons fresh ginger grated
1/4 teaspoon sugar
1/3 cup of soy sauce (Low sodium)
1 hot red pepper/ thai chili pepper (chopped)
1 cup of fresh/dried thai basil (Italian basil will do though the flavor will be slightly different)
1 cup of chopped thai basil
1/4 teaspoon salt
1/4 teaspoon ginger powder
1/4 teaspoon garlic powder
Juice of 1 lime

Directions:
Whisk together fish sauce, oyster sauce, soy sauce, sugar and ginger.

Slice beef thinly (against the grain-look for lines) then sprinkle with ginger powder, garlic powder and salt.

Mix beef with 1 teaspoon of sesame oil and cornstarch.

Heat wok or large pan over high heat and add 1 tablespoon of oil.

Place beef in pan and cook until browned. About 2 minutes per side.

Remove beef from pan and set aside.

Add the rest of the oil and chopped garlic and Thai chili pepper to wok/pan. Cook for 30 seconds

Next add onions and red peppers to pan. Cook until onions caramelize.

Next add stir fry vegetables and allow to cook for an additional 5 to 8 minutes.


Toss beef back in with soy sauce mixture and dried basil (if you are using dried basil)
and stir into vegetables.

Add fresh basil and stir.
Serve over rice with a spirts of lime and enjoy.


Tuesday, September 6, 2016

Fried Tofu with Ginger-Sesame Sauce

September is back to school time and many of us hope to send happy little faces to school to become better versions of themselves. So, we try to send them to school with everything they need and a little piece of home. Something that makes them smile when they open their backpack or lunchbag. But how do you fit that type of comfort in such a small bag with all of the restrictions the school has. The no gluten, no nut etc etc has been the bane of my school lunch existence. What to do? What to do?


Of course, in our house we don't change what we eat because you're a mini me, so this is another  obstacle with school lunch. But this fried tofu lunch doubles just fine for an adult and a child. The original recipe comes from Food and Wine magazine and has a bit more spice. I had to cut down on the red pepper flakes in the ginger-sesame sauce for my little but that spice can be added back in later. This sauce is actually so good, I think about pouring it over other proteins. Like maybe fried chicken wings?? I might have to give the Korean fried chicken place a run for its money. Of course, you should enjoy the sauce whatever way you choose.


Fried Tofu with Ginger-Sesame Sauce
Makes 4 servings

Ingredients:
Ginger-Sesame Sauce
1/2 sesame oil
2 teaspoons grated ginger
2 cloves grated garlic
1 scallion
1 1/2 tablespoon Soy Sauce
1 tablespoon water
1/4 teaspoon crushed red pepper flakes

Fried Tofu
14 ounces firm tofu
2 tablespoons of vegetable oil

Directions:

Slice tofu into 8 thin slabs. Allow tofu to dry on a paper towel.

Lightly sprinkle tofu with salt and press out excess moisture.

While tofu is drying out, in a small bowl whisk together sesame oil, ginger, garlic, soy sauce, water and red pepper flakes.


Set ginger sesame mixture aside.

In a large skillet heat 1 tablespoon of oil (tofu should be added to an already hot pan).

Cook the tofu in two batches using 1 tablespoon of oil for each batch.


Add tofu slabs and cook over medium heat. Cook for approximately 3 to 5


minutes on each side or until tofu is lightly browned on each side.

Spoon ginger-sesame sauce over fried tofu and sprinkle scallions over.

Serve over rice or steamed vegetables.

When packing this as a lunch, I put the sauce in a separate container to be poured over the tofu and vegetables later.


Quick, easy and versatile. If you do not like tofu, you can swap it out for any other protein and it will work.


Tuesday, August 23, 2016

Chocolate Covered Apples

I needed something sweet this weekend but I thought the rain would keep us from my favorite place, the boardwalk. Of course, I didn't want the family to miss out on the experience. So I decided to create a little bit of the boardwalk at home. Let's be honest one of reasons for going to the boardwalk is the food. There are corn dogs and nachos and potato tornados. But  as I said I needed something sweet. And no wonder, a lot of the dishes I've made lately have been savory. So I figured the post this week should be some type of sweet street food. What to do, what to do? Candied apples also know as toffee apples. It's one of the first treats I wanted whenever I went to the boardwalk as a child. I remember the shop that sold it was all the way at the end of the boardwalk. I would run down that way tasting the salt in the air and craving the sweetness of a caramel or chocolate covered apple.


For most people in New Jersey and New York the summer ritual is to go to the shore/boardwalk. Whether it's Coney Island or Seaside, the end of summer hails as the last hurrah. The weather turned out better than expected, and we celebrated with a street food that's screams New Jersey. If no other dish does, this candy covered apple does since it originates with a candy maker from Newark, New Jersey. Of course, many other countries have a variation of this treat. From Australia to Brazil this sweet treat is the fav of carnivals and street celebrations. So, it's a great way to celebrate the end of summer. Enjoy

Chocolate Covered Apples

Makes 6 servings

Ingredients

6 Gala or Fuji apples
1 tablespoon of shortening
2 cups of semi sweet chocolate chips
6 popsicles sticks or lollipop sticks
4 ounces of almond slivers/ crushed oreos etc

Directions:

Twist of stems from the apples and push the lollipop/popsicle sticks down to the core.

Put apples in fridge while preparing the chocolate.

Slowly melt chocolate and shortening in a double boiler (glass bowl over pot of water) over hot water or microwave on high for 2 minutes. If microwaving stir halfway through.


Remove chocolate from heat and stir until completely melted and warm.

Dunk each apple into the chocolate. Let excess chocolate drip back into bowl.


Roll apples around in chocolate while turning it with the stick. Use a spoon if needed to cover the entire apple.

Roll apple in coating (of your choice). Make sure apple is covered completely.

Set on a cookie sheet lined with wax paper until chocolate has set.


Yippie... boardwalk food even though we are not at the boardwalk.

What would you cover your apples with?


Tuesday, August 9, 2016

Mexican Street Corn

After my last post several friends mentioned the street food they love. So, I think August is going to be street food month. And one item that's a summer favorite and a street food fav is corn. It's sweet and delicious. I came across Mexican street corn or elota one summer and haven't looked back.


Corn is the perfect street food because you can eat it with your hands. In Mexico it's skewered which keeps the cheese spread off your hands. The corn is slathered with a creamy, tangy spread that has a hint of heat. Initially, I wasn't sure I would like it. But that tangy spread coupled with the sweetness of the corn was absolutely perfect. Of course, I had to have another one to make sure I really liked it. I did. And the corn was the perfect compliment to a nice taco. In the end, it's a vegetable you won't have to force anyone to eat. Not even your kids.

Note: Sour cream and feta cheese were used because that's what I had in the house.

Mexican Street Corn
Makes 6 servings

Ingredients

6 husked ears of corn
1/4 cup mayo
1/4 cup Mexican creme or sour cream
1/2 cup cotija or feta cheese
2 medium cloves garlic mined
1/4 cup of cilantro
1/2 teaspoon chili powder
salt and pepper to season

Directions:
Place corn over medium high heat on a grill or grill pan (if using a pan add a little bit of cooking spray).

Cook for approximately 10 to 12 minutes turning occasionally allowing the kernels to char.

While corn is cooking mix mayo, sour cream, cheese, garlic cilantro and 1/4 teaspoon chili powder.

Add salt and pepper to taste.
(This is a thicker cheese mixture, for a thinner sauce combine ingredients in a blender for 10 to 20 seconds)

Use a spoon to coat the corn with the cheese mixture.

If you choose, add a little additional cheese and chili powder to finish.

And done!!

What's your favorite street food?


Monday, August 1, 2016

Halal Chicken and Rice

I have a love for the food carts in New York City. It's one of the things that makes me miss living in the city especially in the summer. What's interesting is that almost every major city around the world has some type of street food. In New York, there's a long history of immigrants from Greece to Sri Lanka running food carts. The regional distinctions of the owning are sometimes reflected in the food. One of the most well known is the Halal Guys food cart, which is why this post is titled Halal Chicken and Rice.


I was in the mood for a spicy summer dish that didnt feel heavy but was still filling. Since I was looking for spicy but light in flavor I knew it had to be something Mediterranean (the use of citrus helps to balance the spice). Then I thought, it's been a while since I've had some street food. It was something my friends and I would always do in the summer when we had a little more time. Head uptown, get some food and hang out in the park all day. Luckily, I was able to find a recipe for Halal Chicken and Rice from Serious Eats.  I just made a couple of minor adjustments to the recipe so that it worked for my family.

Note: This dish is quick to make once the chicken has marinated.

Halal Chicken and Rice

Makes 6 servings

Ingredients

For the Chicken:
2 pounds of boneless chicken breasts cubed
½ teaspoon coriander
½ teaspoon cumin
¼ onion powder
2 teaspoons dried oregano
3 cloves chopped garlic
¼ cup olive oil
2 tablespoons lemon juice
kosher salt (at least 1/4 teaspoon)
ground black pepper

For the rice:
2 tablespoons unsalted butter
½ teaspoon turmeric
¼ teaspoon ground cumin
1½ Basmati rice
2½ chicken broth
salt & pepper

For the white sauce:
1 cup of Greek yogurt
½ cup of mayo
½ tablespoon sugar
2 tablespoon white vinegar
1 teaspoon lemon juice
¼ fresh parsley
salt
2 tablespoons black pepper

Red Sauce - Sriracha

Directions:

Combine lemon juice, oregano, coriander, cumin, garlic and olive oil in a blender and blend until smooth.

Season mixture with salt and pepper then coat chicken

Place half the mixture in a bowl or food storage bag with the chicken

Allow chicken to marinate for at least 1 hour

Place remaining olive oil mixture in the fridge to use for later.

Remove chicken from olive oil mixture and season with salt and pepper

heat oil in a heavy (cast iron) pan on medium high heat

Add chicken to pan and cook until brown, about 3 to 4 minutes

Reduce heat to medium and flip chicken allowing it to cook through


Remove chicken from heat and allow to cool

Once cooled place chicken in a bowl with the remaining marinade and place in the fridge

Melt butter over medium heat in a dutch oven or a metal pot.

Add turmeric and cumin to pot and cook for approximately 1 minute

Add rice and stir to coat the rice

Continue to stir until coated rice is lightly toasted

Add chicken broth and season with salt and pepper

Turn heat up to high and bring to a boil

Cover pot and reduce heat to simmer

Cook rice for an additional 15 minutes

Remove from heat and allow rice to rest until it is tender


For sauce combine mayo, yogurt, sugar, vinegar, lemon juice, parsley and 2 tablespoons of black pepper.

Whisk together and salt to taste

Return chicken marinating in bowl to pan and cook over medium high heat until hot

Pile chicken on a half cup of rice with lettuce and tomato and some pita bread.


Drizzle white sauce and Sriracha if you like spice over chicken and rice. Done!!

I think we need more dishes like this. Quick comforting and reminiscent of summer.

What type of street food do you enjoy?


Monday, July 25, 2016

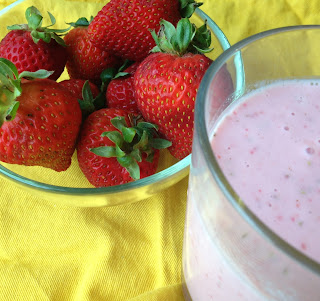
Strawberry Lassi

During the hot summer months, it is sometimes hard to cool down. The recent heat wave has had me scrambling for ways to escape the heat. Then it clicked, I should make a lassi. My mother and I have spent many summer days indulging in lassis to beat the heat. The heat outside and of the delicious dishes we would order from our favorite Indian restaurant. Though the idea of milk and yogurt may seem like a bad combination in the heat, it's actually quite refreshing. The drink lassi comes from Northern Indian where the temperature can reach up to 123 degrees fahrenheit. If anyone knows how to cool down, it would be them. Traditionally, many Indian restaurants in America serve plain lassi or a mango lassi. Since I'm on a strawberry kick, I decided to make a strawberry lassi. Fruit is also a great way to avoid dehydrate in the summer. But that's not why I do it. I do it for the taste of it.


It's funny, a few years ago whenever I wanted a lassi, I would drive to my favorite Indian restaurant. Then about two years ago I got up the courage to ask the chef how the drink was made. And what do you know, he told me. When I realized it was so simple I kicked myself for not asking earlier. Though this is not exactly like a traditional lassi because it is not made with curd it's still pretty good. Now I get to share my good fortune with you. Hope you enjoy it as much as I do.

Strawberry Lassi
Makes 4 servings

Ingredients
9 ounces of yogurt
1/2 cup of milk
1 pound of strawberries
1 tablespoon of honey or 1/2 teaspoon of sugar
sprinkle of cardamon (optional)

Tools: Blender

Directions:

Rinse, hull and chop strawberries


Blend strawberries, honey, yogurt and milk for approximately 2 minutes

Pour into glass


Sprinkle cardamon on top if you choose

Such a refreshing way to beat the heat. What fruit would you use?

Monday, July 18, 2016

Salmon Cakes

From Japan to England there are many countries that have a version of a fish cake.  Bengali fishcakes are made with white fish and chilies.  In South America, potatoes are added. This simple more American version of a fish cake is a crowd pleaser and along the lines of something you'd see in the south. These salmon cakes are a personal favorite as far a comfort dishes go. But I'd be willing to bet that any version of this dish from any country would suit me just fine.


What warms my heart when it comes to this dish? Maybe it's the memories of salmon cakes and grits from my childhood or traipsing through the Inner Harbor of Maryland with friends making a good time of eating every fish cake we could find. Maybe that's why this is a favorite summer dish to me. Summer was when we  had the opportunity to travel and just enjoy life. What ever it may be, I always try to have some canned salmon on hand to make these delicious fish cakes. Forget all that extra breading, we want to taste the salmon.  And if made correctly there is a bit of a crisp outside that will stand up to whatever you throw at it. It's your choice how and when to serve it. Whether it's at breakfast with grits, like down South, or on a nice buttery toasted bun it's the perfect satisfying summer dish. Filling and tasty without being too heavy.

Salmon Cakes
8 patties

Ingredients

1 can of pink salmon
1 large egg (beaten)
1/4 cup of minced onion
1/4 cup of chopped green pepper
1/2 cup of bread crumbs
1/2 teaspoon of flour
2 teaspoons of parsley
4 tablespoons of vegetable oil

Tools: Cast iron pan (frying or saute pan) spatula

Directions:

Go through canned salmon and remove bones.

In a mixing bowl combine salmon, onion, green pepper, bread crumbs, flour and parsley.

Once thoroughly combined, mix in egg and a pinch of salt and black pepper.

Mold salmon mixture into patties.

Heat vegetable oil in pan on medium high heat.

Once oil is hot, add salmon patties (do not crowd the pan).

Once bottom begins to brown (approximately 4 to 5 minutes) flip salmon cakes.

Cook an additional 4 to 6 minutes until golden brown.

Serve as you like.


Monday, July 4, 2016

Cookie Bottom Cheesecake Squares

Happy 4th!! So it's technically not cheesecake season and this isn't your typical 4th of July dessert but I made one anyway. Though cheesecake is typically our fall sweet treat, I'd say cheesecake knows no season. You should be able to have comfort food when ever you crave it. So when my mom asked me for a cheesecake with an oreo cookie bottom for her birthday, I had to oblige. This recipe is simple. No fancy tools required. Just a hand mixer and something to smash some cookies. In addition to being simple, it's made with reduced fat ingredients so you don't have to feel bad eating it. Don't feel the need to follow in my footsteps though.  I only made it with reduced fat ingredients because I was asked. Of course,  if you do use low fat cream cheese and reduced fat oreos you might want to add  some additional oreos to the top of your cheesecake. Yes ... know you want to.


Cookie Bottom Cheesecake
Makes 12 Squares

Ingredients

16 - 20 oreo cookies
4 tablespoons of butter (melted)
3 (8 ounce) packages of cream cheese
1 cup of  sugar
1 tablespoon of vanilla
3 eggs

Tools: 8 x 8 pyrex dish, hand or stand mixer
Optional -food processor, parchment paper

Directions:

Preheat oven to 350 degrees F.

Place parchment paper cut to the size of the dish in the bottom of the pyrex

Crush oreo cookies

Add butter to crushed oreo cookies. Mix well

Press oreo mixture into the bottom of the pyrex dish.

Make sure it is spread evenly.

Add cream cheese and sugar to a medium bowl/stand mixer and mix until smooth.

Blend in vanilla.


Add eggs, one at a time.

Mix just until incorporated (do not over mix)

Pour cream cheese batter over oreo crust

Bake for approximately 45 minutes until to edges are firm.

Turn oven off and allow cheesecake to sit in oven for an additional 15 to 30 min (this should help prevent cheesecake from cracking).


Chill in fridge until ready to serve.


Monday, June 6, 2016

Sausage w/spinach, mushroom and tomatoes


So, I used to think adding vegetables made a dish healthy. When my husband and I first decided we were going to lose weight together, we used Dr. Ian's Fat Smash diet. I'm sure we both thought our worlds were going to fall apart. Him because there was no meat for the first part of the diet. Me because I didn't know white rice was bad (heck, it tastes so good). These are the foods we grew up eating, and we realized we had a lot of bad eating habits we had to change. That might be why I now try to throw vegetables in a dish anytime I can.


One go to dish before my epiphany was Italian sausage and peppers over pasta. It was quick and satisfying. Of course, as we became more selective with our food choices, I decreased the amount of sausage and increased the number of vegetables in this dish. As I continued to try to make my "go to" healthier,  I learned mushrooms add a bit of protein, Vitamin D and are great for your metabolism. Spinach adds vitamin C, Vitamin K, folate and a whole bunch of other nutrients. Hmmm, that's why this dish is just the right amount of wrong and right. The sausage provides the old school comfort you want from sausage and peppers and the vegetables provide great health benefits. Comfort food doesn't always have to make you feel guilty or be bad for you. Yay!!

Sausage with spinach, mushroom and tomatoes

Makes 6 servings

Ingredients:

1 pound of italian sausage
1 medium onion(sliced)
4 cloves of garlic (minced)
2 roma tomatoes(quartered)
12 ounces of mushroom (sliced)
10 ounces of spinach
1 teaspoon of dried basil
1 tablespoon olive oil
salt and pepper to taste.

Tools: cast iron pan

Directions:

Place sausage in cast iron pan over medium high heat and cover with water.

Boil sausage for approximately 8 to 10 minutes.

Remove from pan and allow sausage to cool. Once cooled slice diagonally.

Return sausage to pan and allow to brown. Remove once sausage is brown and full cooked

Heat olive oil in pan, add sliced onions, garlic, mushrooms, and tomatoes. Cook for  2 to 3 minutes.


Add spinach, dried basil and stir allowing mixture to cook for  2 to 3 minutes.

Return sausage to pan with vegetables. Reduce heat to low and allow to cook for 10 to 15 minutes while flavors meld.

Add salt and pepper to taste.


If you care not for guilt, add pasta and parmesan or mozzarella cheese to this dish and enjoy.