Replace El's Kitchen: International Comfort Food: Chocolate
Showing posts with label Chocolate. Show all posts

Tuesday, August 23, 2016

Chocolate Covered Apples

I needed something sweet this weekend but I thought the rain would keep us from my favorite place, the boardwalk. Of course, I didn't want the family to miss out on the experience. So I decided to create a little bit of the boardwalk at home. Let's be honest one of reasons for going to the boardwalk is the food. There are corn dogs and nachos and potato tornados. But  as I said I needed something sweet. And no wonder, a lot of the dishes I've made lately have been savory. So I figured the post this week should be some type of sweet street food. What to do, what to do? Candied apples also know as toffee apples. It's one of the first treats I wanted whenever I went to the boardwalk as a child. I remember the shop that sold it was all the way at the end of the boardwalk. I would run down that way tasting the salt in the air and craving the sweetness of a caramel or chocolate covered apple.


For most people in New Jersey and New York the summer ritual is to go to the shore/boardwalk. Whether it's Coney Island or Seaside, the end of summer hails as the last hurrah. The weather turned out better than expected, and we celebrated with a street food that's screams New Jersey. If no other dish does, this candy covered apple does since it originates with a candy maker from Newark, New Jersey. Of course, many other countries have a variation of this treat. From Australia to Brazil this sweet treat is the fav of carnivals and street celebrations. So, it's a great way to celebrate the end of summer. Enjoy

Chocolate Covered Apples

Makes 6 servings

Ingredients

6 Gala or Fuji apples
1 tablespoon of shortening
2 cups of semi sweet chocolate chips
6 popsicles sticks or lollipop sticks
4 ounces of almond slivers/ crushed oreos etc

Directions:

Twist of stems from the apples and push the lollipop/popsicle sticks down to the core.

Put apples in fridge while preparing the chocolate.

Slowly melt chocolate and shortening in a double boiler (glass bowl over pot of water) over hot water or microwave on high for 2 minutes. If microwaving stir halfway through.


Remove chocolate from heat and stir until completely melted and warm.

Dunk each apple into the chocolate. Let excess chocolate drip back into bowl.


Roll apples around in chocolate while turning it with the stick. Use a spoon if needed to cover the entire apple.

Roll apple in coating (of your choice). Make sure apple is covered completely.

Set on a cookie sheet lined with wax paper until chocolate has set.


Yippie... boardwalk food even though we are not at the boardwalk.

What would you cover your apples with?


Monday, February 29, 2016

Crêpes w/ Nutella Cannoli Filling

We recently got a crêpe place in the mall. I've loved crêpes ever since college. Of course, I was excited but it soon wore off. One long weekend the International Club planned a trip up to Quebec and I think I had a crêpe at every place that would sell it to me. I've eaten more crepes in Quebec in three days than I have in the United States over the course of a few decades.


There's just something about that sweet, buttery combination that makes me reminisce about good times and the love I have for Quebec. My little one also likes crepes. While I can't wait to take him to Quebec so he can have that experience for himself, I will be his official crêpier.

I first decided I was going to make this recipe when I saw Chef Anne Burrell make them on the show The Kitchen. It looked so easy I wasn't sure why I haven't been making them at home. Then I remembered the last time I tried. It turned out a hot mess, but I was much more confident this time around. So confident I decided to create my own special filling.

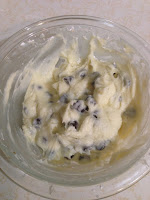
Cannoli filling is something else I've been meaning to make. Our friends brought a cannoli dip to the house once and I've been in love ever since. Actually many of our friends were in love that day especially since you can't get it everywhere. I made this filling with cream cheese and Mascarpone not ricotta because that's what we had in our house. Hey, a girls gotta do what a girls gotta do. I hope you like it.

Crêpes with Nutella Cannoli Filling
Makes 18 crêpes

Crêpe Ingredients

1 cup of flour
pinch of salt
2 eggs
1/2 cup of club soda
1/2 cup  of milk
3 tablespoons of butter
Additional butter for cooking crêpes

Nutella & "Cannoli Filling"
8 ounces of mascarpone
4 ounces of cream cheese
1 to 1 1/2 cup of powered sugar
1 cup of chocolate chips.
1/2 teaspoon of vanilla

Tools: mixing bowl, ladle, cast iron pan, whisk & hand mixer

Filling Directions
Place mascarpone and cream cheese in a bowl. Use an electric mixer to beat items together until combined.

Add 1/2 teaspoon of vanilla

Add powdered sugar 1/2 a cup at a time using electric mixer to blend ingredients together.


Lastly, fold chocolate chips in with a spatula.

Crêpe Directions
Place flour and salt in a mixing bowl.

Make a well in the center of the bowl.

Place eggs, milk, club soda and butter in the well in the center.

Whisk all ingredients together until combined.

If mixture seems thick (more like pancake batter than cake batter) whisk in a little more milk.

Allow the mixture to set for 30 minutes.

Place cast iron pan on medium heat.

Melt a small amount of butter in the pan (I actually just take a stick of butter and gently glide it over the bottom of the pan making sure all parts of the pan a coated).

Fill a ladle with crêpe mixture, and starting from the center pour the mixture in the center of the pan.

Gently tip the pan from side to side to roll the crêpe mixture around the pan.


When the edges of the crêpe begin to pull away and the bottom starts to brown (1 1/2   to 2 minutes) it's time to flip the crêpe.

Cook on the other side for an additional minute.

Place crêpe on a plate and make the next.

Separate crêpes with parchment paper. You can also keep them warm by heating the oven to 200 degrees and placing the plate of crêpes in the oven covered by a damp towel.

The best part of this whole process is eating it. Take a small spoonful of Nutella and spread across the crêpe. Then take a tablespoon of the cannoli filling and spread it across.


You can fill this crêpe with flambéed bananas or chocolate. You might even want to put a scope of ice cream on top. The world is your with this one.


Monday, December 14, 2015

Chocolate Gingerbread Men

The mission for this weekend started with marking holiday bark. It's a great gift to colleagues and friends. If you know the person well, you can add their favorite sweet to this chocolate treat. About a a week or two ago I purchased some chocolate melts to make some Thanksgiving lollipops. Unfortunately, I never used it so I thought this would be the perfect time to do so.


I like making bark. It's pretty simple and you can add your own spin to it. Maybe some candy canes or some almonds. The hardest part is melting the chocolate down and the chocolate melts make that pretty simple. Just pop them in the microwave for 30 seconds to 2 minutes (depending on how many) and it's melted and ready to be smeared on some parchment and topped with your favorite candy or dried fruit or nuts. Then into the fridge it goes to harden. It's that simple.

Of course, today's experiment was even more simple because in the end I realized this was not plain chocolate but chocolate mint melts. So,

I just put the chocolate in a silicon mold. Nice and easy.

Ingredients
12 oz Candy Melts

Tools: Silicon Mold -24 Cavity Gingerbread Man

*Note: If you are making bark spread chocolate on parchment paper on a baking sheet.
If you do not have candy melts you can use chocolate chips. Just add a little bit of shortening.

Directions:
Gently melt candy in the microwave 30 seconds at a time.

Using a spatula gently pour even amounts of chocolate into the cavities.

Refrigerate for 30 minutes to an hour.


Monday, August 31, 2015

Indulgent Brownies

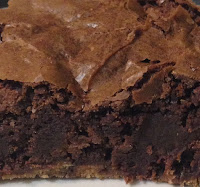
These brownies are ridiculous. One of my students made a version of this for me in cooking class. I was pregnant at the time and it seemed as if it was her mission to see how much she could feed me. It was sweet, my students wanted to take care of me. So these brownies have a special place in my heart. It's always nice when someone does something just because they think it might make you happy.


The original recipe is just a mixture of cookies and brownies. Since I tend to overdue it, I'm going to add an additional level by adding chocolate chips to the batter which is also made out of chocolate chips. I typically add walnuts to my brownies but I knew I would be giving these away and I was worried about nut allergies. I'm a big fan of using what is already in the house so this recipe is right up my alley. I'm not sure how it happened but there seems to be an over abundance of chocolate and chocolate chips in the house.

Indulgent Brownies

Makes 9 Brownies

Ingredients

12 cup of sugar
2 tablespoon of butter
2 tablespoon of milk
12 cups of semisweet chocolate chips
2 eggs (room temperature)
1tsp of vanilla extract
 23 cups of all purpose flour
1tsp of baking soda
12 tsp of salt
12 chocolate chip cookies
1cup of chocolate chips

Directions

Preheat oven to 350 degrees. Grease an 8 x8 inch square pan.

On low heat in a medium saucepan combine sugar, butter and milk until boiling.

Remove mixture from heat and add chocolate chips until melted and smooth.
Let the mixture cool.

While chocolate is cooling, combine flour, baking soda and salt in a separate bowl.

Add eggs and vanilla to chocolate mixture. Then add flour mixture.

Chop the chocolate chip cookies into small chunks. Place the chopped cookies on the bottom of the greased pan.

Sprinkle chocolate chips into brownie mixture and pour over cookies. Spread mixture evenly in the pan.

Bake for 25 to 30 minutes. Remove pan and let cool for an additional 20 minutes.


Cut into squares  or rectangles and enjoy.


Thursday, August 20, 2015

Spiced Cake Pops

Every wonder what to do with leftover cake crumbs? After I made the Apple Pie Cupcakes I had cake crumbs from the centers I removed. I know at times, it seems as though I'm joking when I talk about recycling bacon grease and being environmentally friendly but I'm actually really serious. These are not jokes. If we can reuse it or recycle it we do.


So I had to find something to do with the crumbs. Hello spiced cake pops. Cake pops are great because it allows me to use any left over cake and icing I might have and it's bite sized.

Spiced Cake Pops

Makes 8 cake pops

Ingredients

1/2 cup cake crumbs
1 tablespoon of cinnamon frosting
1 cup of white morsels or 4oz of candy melts
splash of heavy cream

8 Lollipop Sticks

Optional: Sanding sugar, sparkle gel or sprinkles for decoration.

*Note: I'm using white morsels because I have it in the house. White chocolate melts or white bakers chocolate is much easier to work with and dries quicker. You also won't need to use as much of it.

Click for the Spice Cake Recipe and Cinnamon Frosting recipe.


Directions:
Crumble spice cake in a bowl. Add about a tablespoon of frosting. Mix thoroughly using your hands or a fork.
You don't need a lot of frosting. Just enough to hold the cake together.

Using a round tablespoon, scoop the cake & frosting mixture into balls.

Once you have your cake balls. It's time to melt to chocolate. 
Melt the chocolate in the microwave for 30 seconds, until smooth. 

If you are using morsels after the first 30 seconds stir and microwave for another 30 seconds. It should take you no longer than 2 minutes to get a smooth consistency.


Dip the tip of the lollipop stick into the melted chocolate, then into the cake ball.

Place the cake pops on parchment paper and let them set in the freezer for at least 30 minutes.

Remove the cake pops from the freezer and remelt your chocolate. Dip the cake into the melted chocolate and turn to coat evenly. Twirl the cake pop gently until the chocolate begins to set.

*Note: I coated the pops twice. The second time using chocolate with a splash of heavy cream in a double boiler (glass bowl over a pot of water). It created a smoother coating for my cake pops. That option resulted in a much longer time twirling the coating onto the cake pop waiting for it to dry.

Place the coated cake pops on parchment paper or stick the lollipop ends in a piece of styrofoam and place it into the refrigerator.


Before I was finished some cake pops were confiscated... so it must be good.